 in the main toolbar).
|
Die Funktion „Konvexe Bereiche“ ist experimentell, die folgende Dokumentation ist teilweise unvollständig oder ungenau. |
Konvexe Bereiche are not drawing elements, they are just part of a set of tools used to modify drawing elements and for which you need to focus only on those control points or this part of the drawing that are within some bounded area defined as a union of convex zones. For instance, convex zones can be used to move around some of the control points of drawing elements, or to trim a drawing element.
Konvexe Bereiche sind keine Elemente, die gezeichnet werden, sie sind nur ein Teil eines Satzes von Werkzeugen zum Zeichnen Elemente modifizieren und für die Sie sich konzentrieren nur auf die Kontrollpunkte oder diesem Teil der Zeichnung sind die innerhalb Einige begrenzten Bereich als eine Vereinigung von konvexen Zonen definiert. Zum Beispiel konvexen Zonen verwendet zu bewegen einige der Kontrollpunkte werden Zeichnungselemente oder eine Zeichnung Element trimmen.
Konvexe Bereiche can be defined for each drawing separately, however they are not part of the drawing document, and as such, they are lost when you close a drawing board.
Konvexe Bereiche können für jede Zeichnung getrennt definiert werden, trotzdem sind sie nicht Teil der Zeichnung, und als solche gehen sie verloren, wenn ein Zeichenbrett geschlossen wird.
As far as extensible Bezier curves are concerned, a simpler and less powerful alternative to convex zones, when you want to act on several control points at a time, is to use the GLOBAL/LOCAL edit point mode
Soweit erweiterbare Bezierkurven betrifft, ein einfacheres und weniger leistungsstarke Alternative zu konvexen Zonen, wenn Sie an mehreren handeln wollen Kontrollpunkte in einer Zeit, ist die GLOBAL / LOCAL Schnittmarke Modus verwenden (See (Globaler/lokaler Punktbearbeitungsmodus)actions_globallocalmode.)
Konvexe Bereiche are visible and can be used only when the convex zone
palette is visible, and are hidden otherwise. To use convex zones, first
make the convex zone pallette visible by clicking on
in the main toolbar).
Konvexe Bereiche sind sichtbar und können nur verwendet werden, wenn die
„konvexe Zone Palette“ sichtbar ist, und ansonsten sind verborgen. Um
konvexe Bereiche verwenden, erste machen die konvexe Zone Palette
sichtbar, indem Sie auf
in der Haupt-Symbolleiste).
Ein konvexer Bereich wird als Schnitt einer oder mehrerer Halbebenen definiert, jede Halbebene ist wiederum durch zwei Kontrollpunkte definiert:
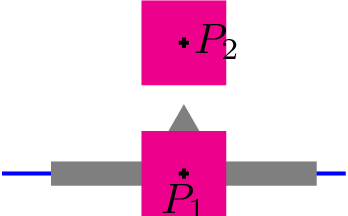
Each Halbebene that compose a convex zone is viewed with its border line and with a Halbebene sign like this:
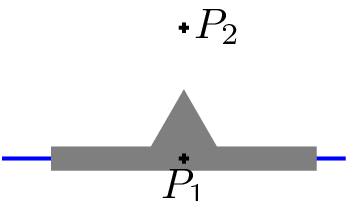
Die Umrandung eines konvexen Bereichs wird blau dargestellt. When the convex zone is selected the first and second control point are viewed as the Halbebene sign and as a small square in magenta color. When the convex zone is not selected, only the Halbebene sign is visible, and it is viewed in grey colour wie folgt:
When you edit convex zones, there is a number of things that jPicEdt prevents you from doing:
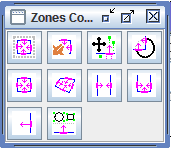
Each button can display a tooltip if the mouse hovers around it more than two seconds.
Die Auswahl eines konvexen Bereichs wird mit dem entsprechenden Auswahl-Werkzeug durchgeführt (See Auswahl eines konvexen Bereichs). The convexe-zone-selection and the selection (of drawing elements) are two different selections.
Menu commands, or keyboard shortcuts such as „Select all“, „Suppress“, „F2“ and suchlikes selection-dependent actions, may act either on the drawing element selection, or on the convexe-zone selection, but never on both of them.
The following rules apply:
An alternative to the „Use convexe-zone selection“ tool is to use the same shortcuts with Strg-U prefix. For instance the sequence Strg-u Strg-C will copy a control zone, Strg-U Strg-X will cut it, Strg-U Strg-V will paste it, Strg-U Strg-A will select all control zones, etc. … The sequence Strg-U Strg-G has no effect, it just relaxes the Strg-U prefix.
Wenn das Werkzeug zur Auswahl eines konvexen Bereichs
 aktiviert ist, können konvexe Bereiche wie folgt bearbeitet werden:
When the convex zone edition tool

is active you can add or remove Halbebenes to a convex zone as follows:
If you select a convex zone then click-right and choose Negate in the context menu, the convex zone, that is an intersection of Halbebenes, is transformed to the union of complementary Halbebenes.
Negation can be applied to a selection of several convex zones, so that it is reversible by negating a second time. In other words negating twice has almost no effect. almost is there just because, if in the process of negation some empty convex zones are created, they are suppressed. For instance if you select two convexes zones, with the first one containing the second one, negating twice will suppress the inner convex zone.
When using any of the convex zone edition tools, you can go by at any time to
the standard convex zone SELECT tool
( ), by a single right-click.
Following is a list of all available convexe-zone tools as well as their associated icon on the convex zone palette. Some convexe-zone tools support a set of alternate functions: these are triggered by a specific combination of modifiers (Control+Shift, Control+Alt or Control+Alt+Shift, as indicated), and allows you to release or enforce one or more geometrical constraints (the same combinations are used as in SELECT mode, except for the Strg modifier which makes no sense here). Modifiers may be pressed or released at any time during the convexe-zone tool process.
| Icon | Tool | Number of control points | Editing sequence | Alternate functions |
|---|---|---|---|---|
| Convex zone Selection | Keine | Click on any convex zone boundary or Halbebene signs, to select the whole convex zone. (See Convex zone selection for details). | Umschalter: the same sequence as for selecting a convex zone can be used to
unselect it, or to add another convex zone to the convexe-zone-selection |
| Convex zone Edition | Keine | Click on any convex zone boundary or Halbebene signs to select the whole convex zone. Remove any Halbebene from the convex zone by clicking on the corresponding Halbebene sign. (See Convex zone edition for details). | Strg modifier to add Halbebenes to the convex zone. |
 | Rectangular convex zone. | 2 | First corner, opposite corner. Sides are kept parallel to the grid axes. | Strg: nail the center of the rectangle to its first point
position. Strg+Alt: release the constraint on sides. (Hold the modifiers whenever you want to alter the side’s orientation, then release it and move the mouse to scale the rectangle). Umschalter: rectangle is negated. (see Negation). Strg+Umschalter: nail center and negate. Strg+Alt+Umschalter: releasing the constaint on side orientation and negate. |
 | Extensible convex zone. | Variable | First control point of first Halbebene, second control point of first Halbebene, first control point of second Halbebene, and so one. Terminate with a right-click. | Keine |
 | Band-shaped convex zone. | 2 | First side, Second side. Sides are kept parallel to the grid axes. Band direction is orthogonal to the line passing through first and second points. | Strg: nail the center of the band the first point
position. Strg+Alt: release the constraint on sides parallel to grid axes. Umschalter: negate (see Negation) Strg+Umschalter: nail center and negate. Strg+Alt+Umschalter: release the constaint on sides orientation and negate. |
 | U-shaped convex zone. | 3 | First corner, Second corner, Top of U. Sides are kept parallel to the grid axes. | Strg: nail the center of the bottom side of U to the
first point position. Strg+Alt: release the constraint on sides parallel to grid axes. Umschalter: negate (see Negation) Strg+Umschalter: das Zentrum fixieren und nail center and negate. Strg+Alt+Umschalter: release the constraint on sides orientation and negate. |
 | Halbebene convex zone. | 2 | First control-point Second control point. Sides are kept parallel to the grid axes. | Strg+Alt: release the constraint on sides parallel
to grid axes. Hold
the modifiers whenever you want to alter the side’s orientation, then release
it and move the mouse to scale the rectangle). Umschalter: negate (see Negation) Strg+Alt+Umschalter: release the constraint on sides orientation and negate.* |
 | Translate all drawing elements control points within the selected convex zone. | Keine | Click at one of the convex zone (by clicking on its border line, or on one of its control point), and drag the mouse, i.e. keep click button down as moving the mouse. All the drawing element control points that are within the considered convex zone zone will be translated accordingly as well as the considered convex zone. Note that for extensible Bezier curve control points that are not subdivision points; but for which the corresponding subdivision point is within the selected convex zone are also translated. | With Strg modifier, all selected convex zone,
instead of just the one you drag upon are used for translation. With the Strg+Alt modifier all the existing convex zones are considered. |
 | Trim all drawing elements. | Keine | The intersection of the union of all existing convex zones, and of of all the seelcted drawing elements is erased. This can involve conversion of some element types (for instance rectangle) to extensible Bezier curves. | Keine |
 | Use convex zone selection. | Keine | Toggling this button on and off allows you to decide selection dependent action like „Cut&Paste“, or „Select all“ act on the drawing element selection, or on the convexe-zone selection. (See Use convex zone selection for details) | Keine |
For all convex zones, when the „Convex zone Select“ tool state is active, pressing F2 will open a properties-panel for the first convex zone in the convexe-zone selection. This in particular allows you to edit convexe-zone control points coordinates by hand, or to change the angle of the vector P1 P2 w.r.t. horizontal by hand.